

Accept online payments in WooCommerce using DPO Pay
The DPO Pay plugin for WooCommerce lets you accept online payments directly from your WooCommerce store, including credit and debit cards, digital wallets, and other payment methods supported by DPO Pay.
This official plugin connects your WooCommerce checkout to the secure DPO Pay payment platform, giving your customers a simple and trusted way to pay.
Why Choose DPO Pay?
DPO Pay provides a secure checkout experience for your shoppers with a wide range of payment methods to choose from. Transactions are protected by intelligent fraud monitoring engines that operate around the clock.
With a single integration you gain access to:
-
Local and international card payments
-
Multiple African payment methods
-
Secure hosted payment processing
-
Reliable transaction management
-
Advanced fraud protection
Download the Plugin
You can download the latest version of the WooCommerce plugin directly from here:
Installation Guide
Step 1 – Install the Plugin
-
Log in to your WordPress admin dashboard
-
Navigate to Plugins → Add New
-
Click Upload Plugin
-
Upload the file:
dpo-group-for-woocommerce.zip -
Click Install Now
-
Once installed, click Activate
Configuration Guide
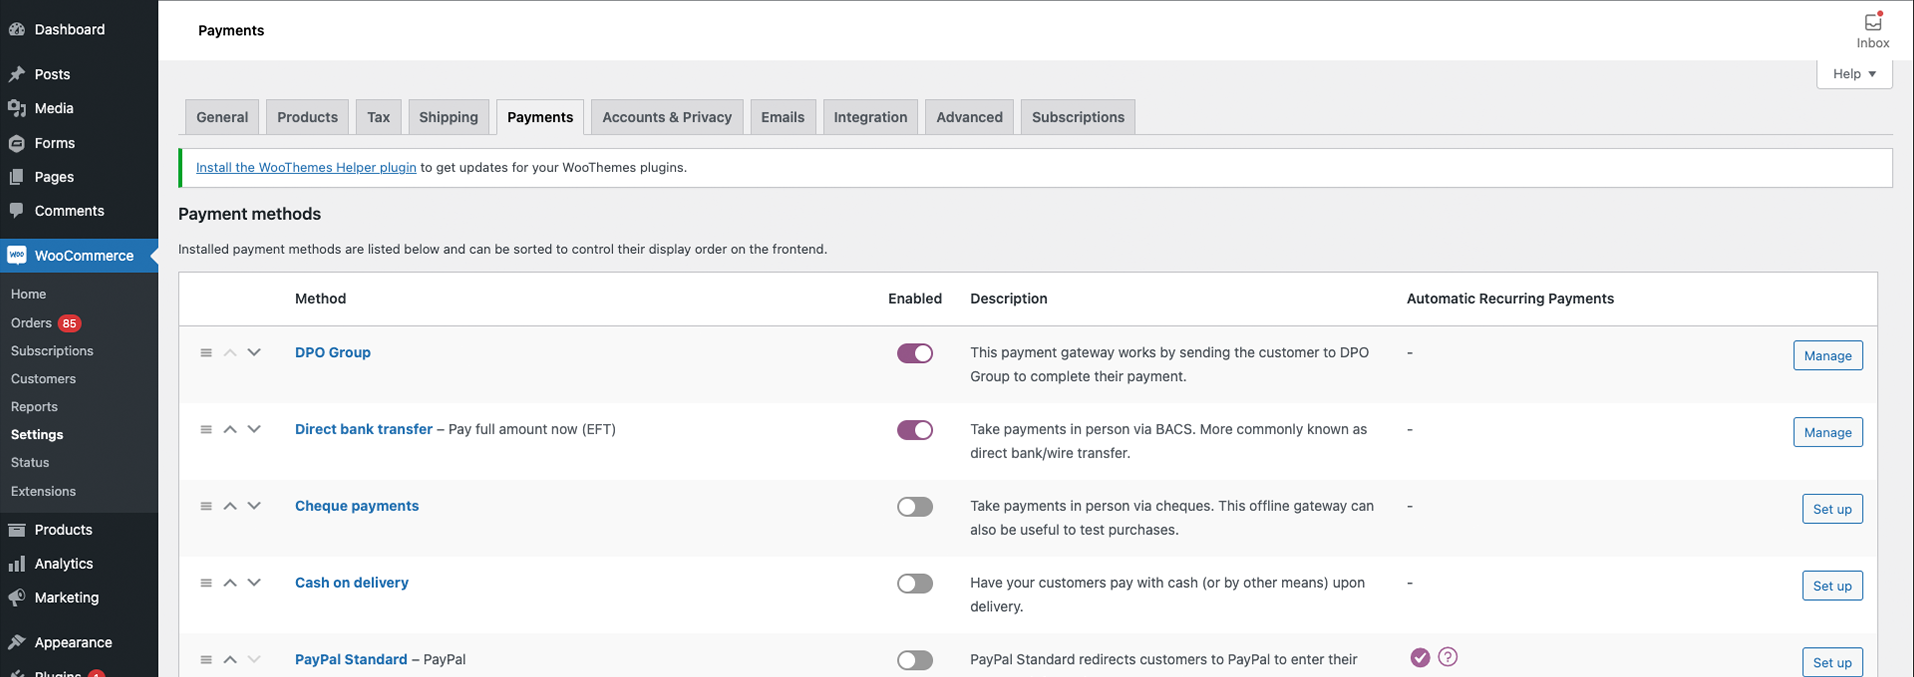
Enable the Payment Gateway
-
In your WordPress dashboard, go to:
WooCommerce → Settings → Payments -
Locate DPO Group in the list of payment methods
-
Toggle the switch to Enabled
-
Click Manage
Screenshot: WooCommerce Admin Payments Screen
Primary Settings
On the DPO Group settings page:
-
Tick Enable DPO Group Gateway
-
Confirm the Title and Description shown to customers
-
Enter your Company Token (provided by DPO Pay)
Screenshot: WooCommerce Admin DPO Pay Primary Settings
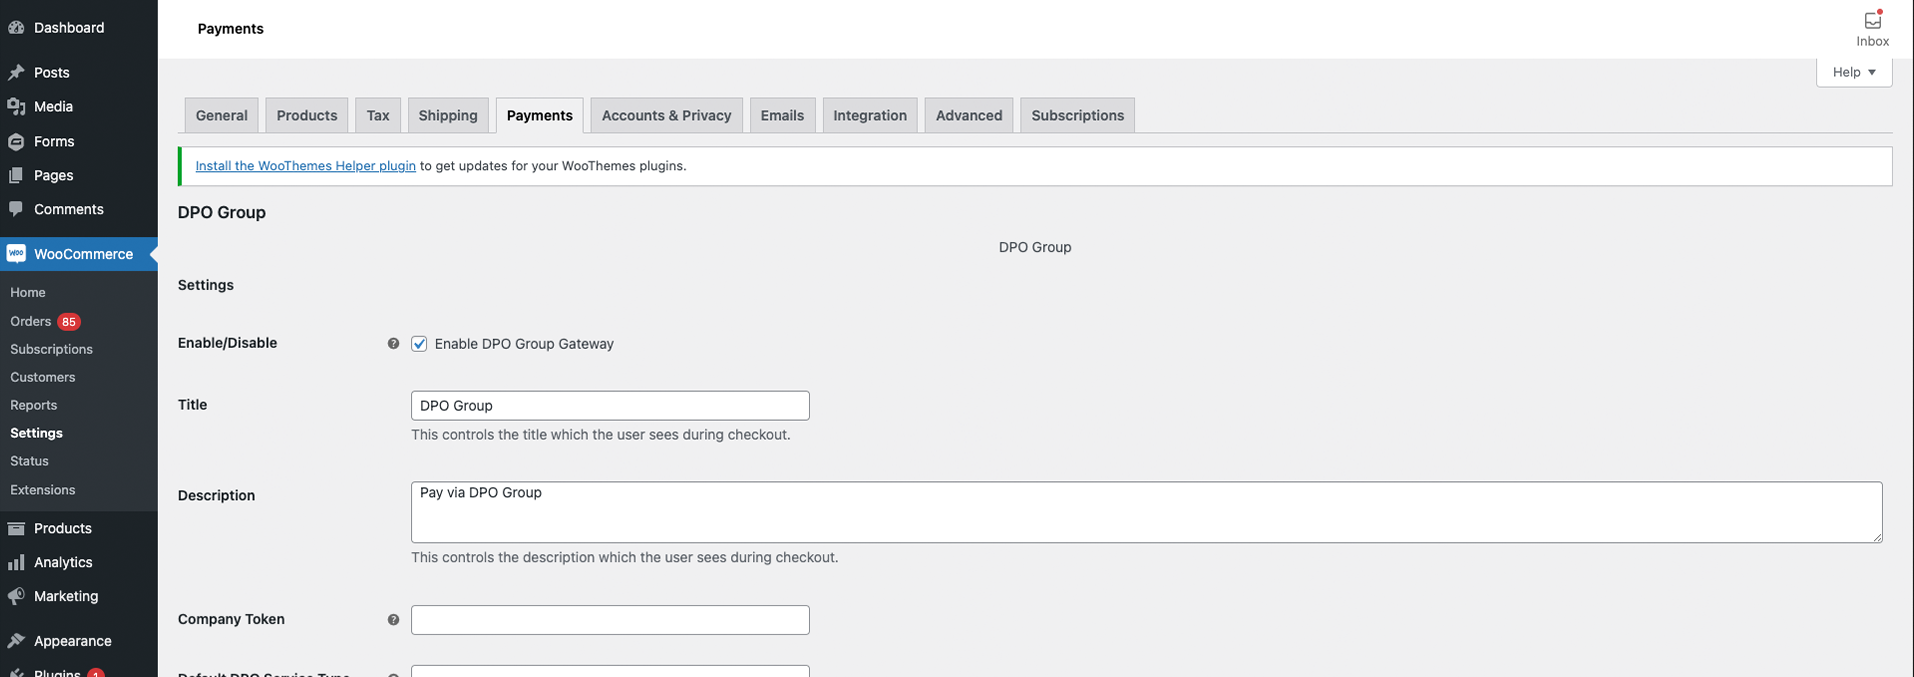
The Company Token is required for the plugin to connect securely to your DPO Pay merchant account.
Additional Settings
Scroll down to configure advanced options:
-
Default DPO Service Type – optional service code
-
Enable Test Mode – for sandbox transactions
-
Enable Logging – recommended for troubleshooting
-
DPO Group API URL – default value should not be changed
-
DPO Pay URL – default value should not be changed
-
PTL Type – Minutes or Hours
-
PTL – payment time limit
-
Successful Order Status – e.g., Processing
-
Order metadata options (optional)
Screenshot: WooCommerce Admin DPO Pay Additional Settings
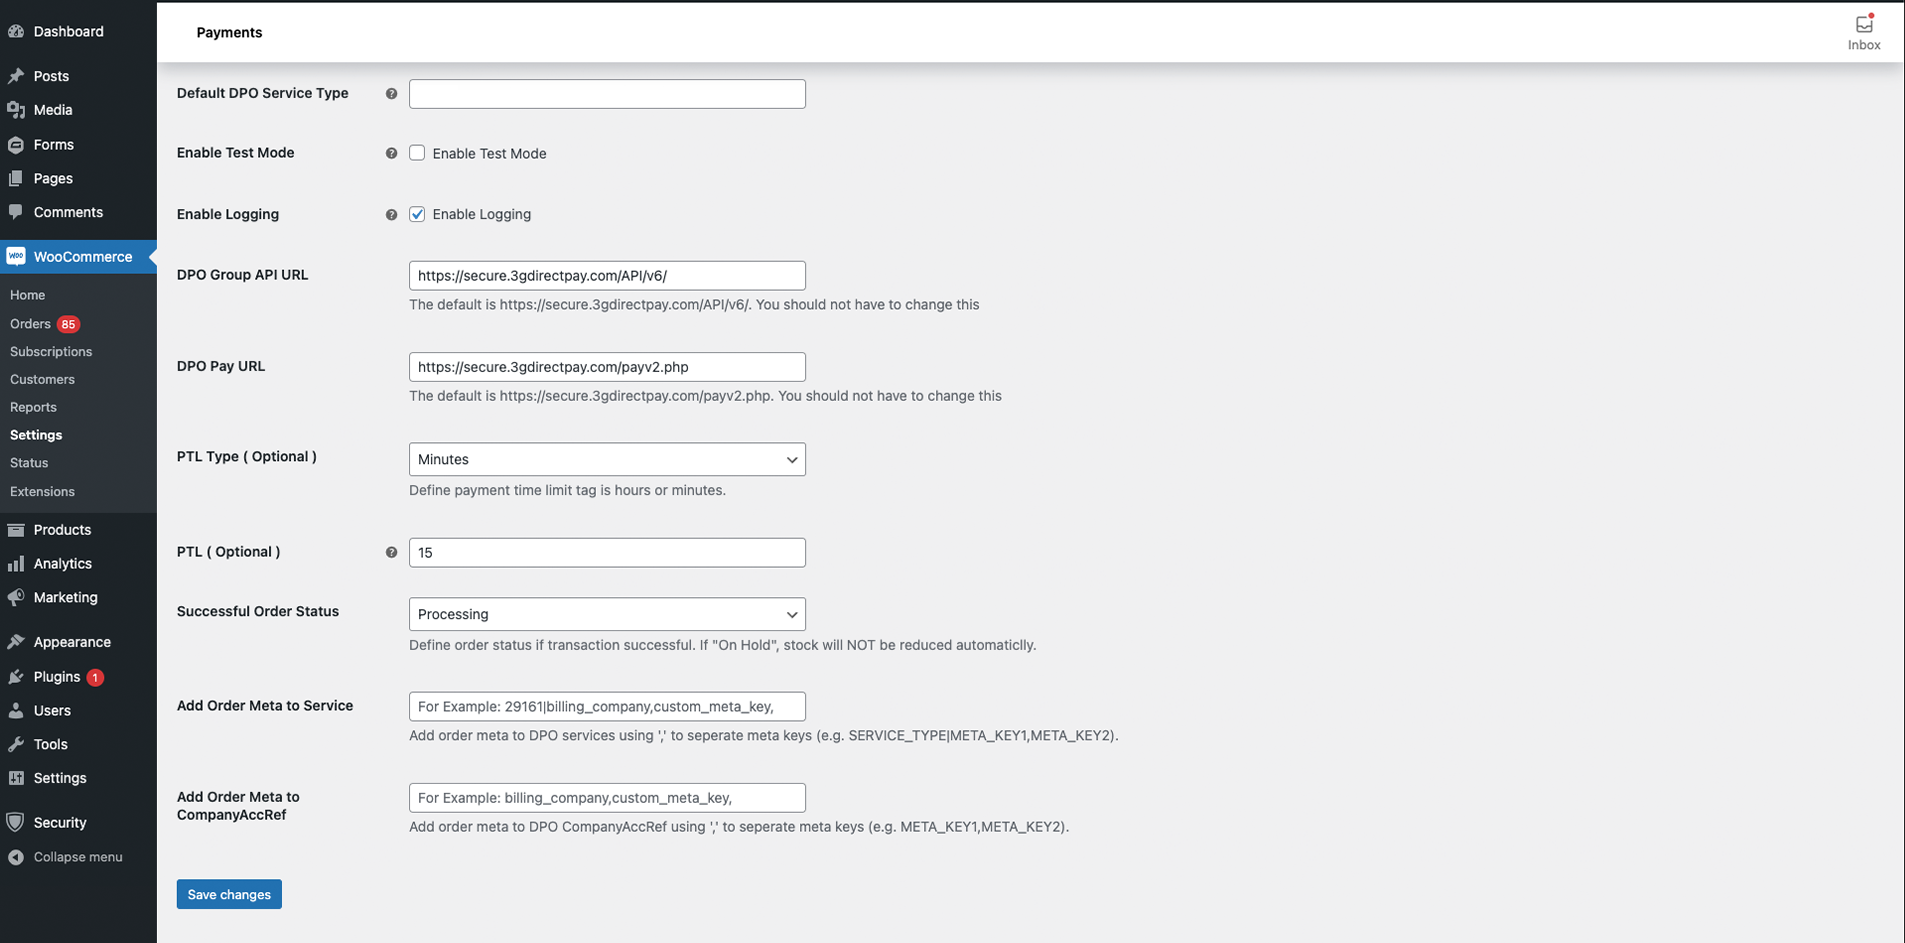
Once all settings are configured, click Save changes.
Product-Level Configuration
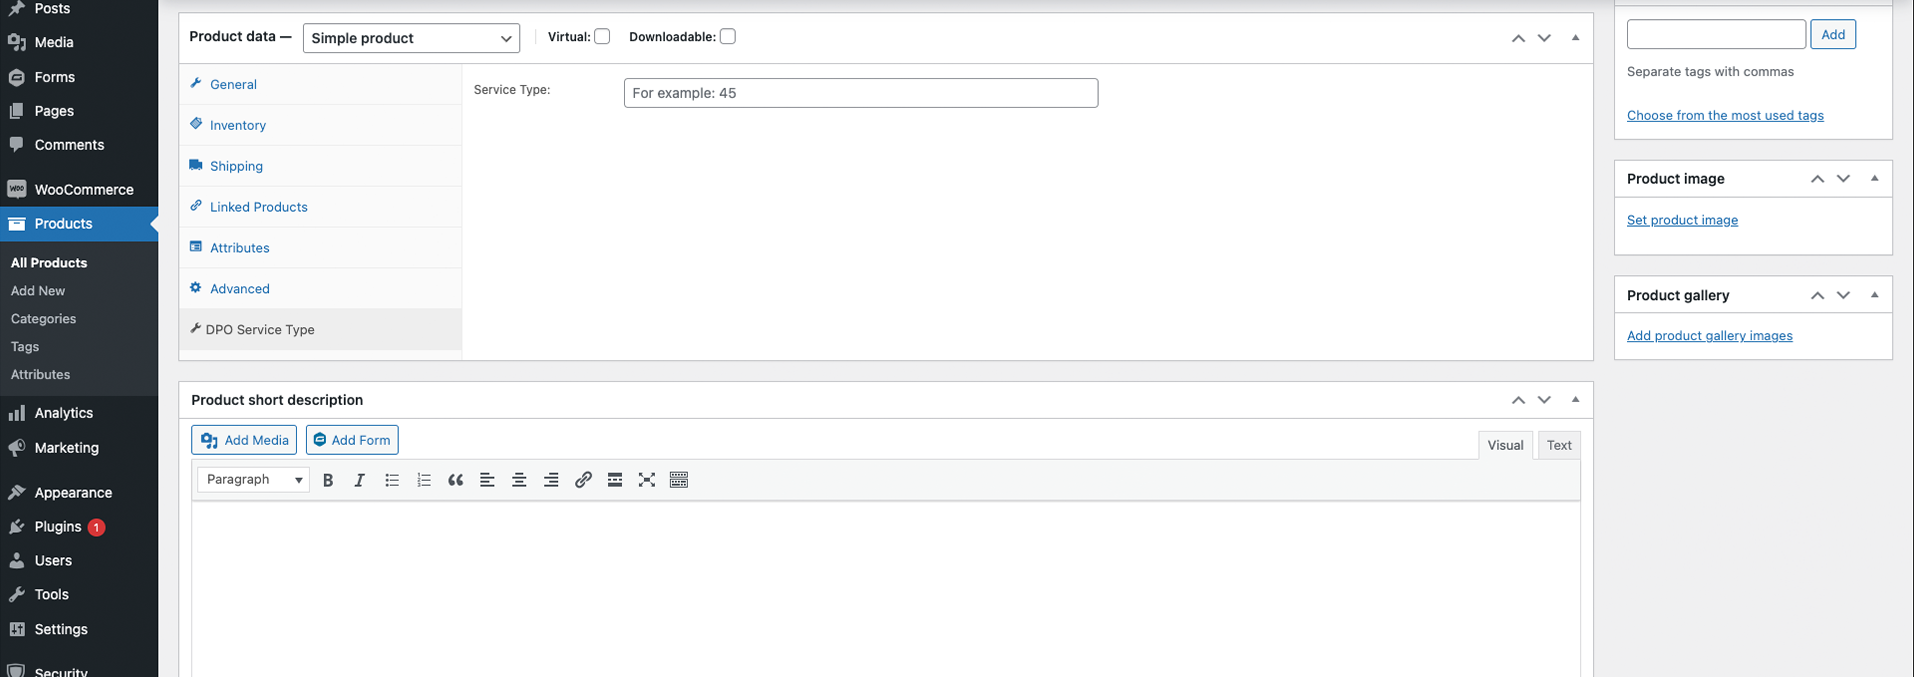
For stores using service-based products, you can optionally define a DPO Service Type per product:
-
Open a product in WooCommerce
-
Scroll to Product Data
-
Open the DPO Service Type section
-
Enter the required service type code if applicable
Screenshot: WooCommerce Admin Product Page Settings
Customer Payment Flow
After setup is complete:
-
The customer adds items to their cart
-
At checkout they select DPO Group as the payment method
-
They are redirected to the secure DPO Pay hosted payment page
-
After payment, they return to WooCommerce with a confirmed order
No coding or custom development is required.
Frequently Asked Questions
Does this require a DPO Pay merchant account?
Yes! You need to sign up with DPO Pay to receive a Company Token key and other details for this gateway to function.
You can do so at dpogroup.com/get-started/ or by emailing [email protected].
Does this require an SSL certificate?
We do recommend obtaining an SSL certificate to allow an additional layer of safety for your online shoppers.
Where can I find API documentation?
For help setting up and configuring the DPO Pay plugin, please refer to our user guide and integration documentation available on the DPO Pay developer portal.
I need some assistance. Whom can I contact?
Need help to configure this plugin? Feel free to connect with our DPO Pay Support Team:
-
Email: [email protected]
-
Phone: +254 (0) 709 947947
Troubleshooting Tips
-
Ensure your Company Token is entered correctly
-
Confirm the correct environment (Test Mode / Live Mode)
-
Do not modify the default API URLs
-
Enable logging if transactions are not completing
-
Verify your merchant account is active and enabled